Custom Export Dashboard
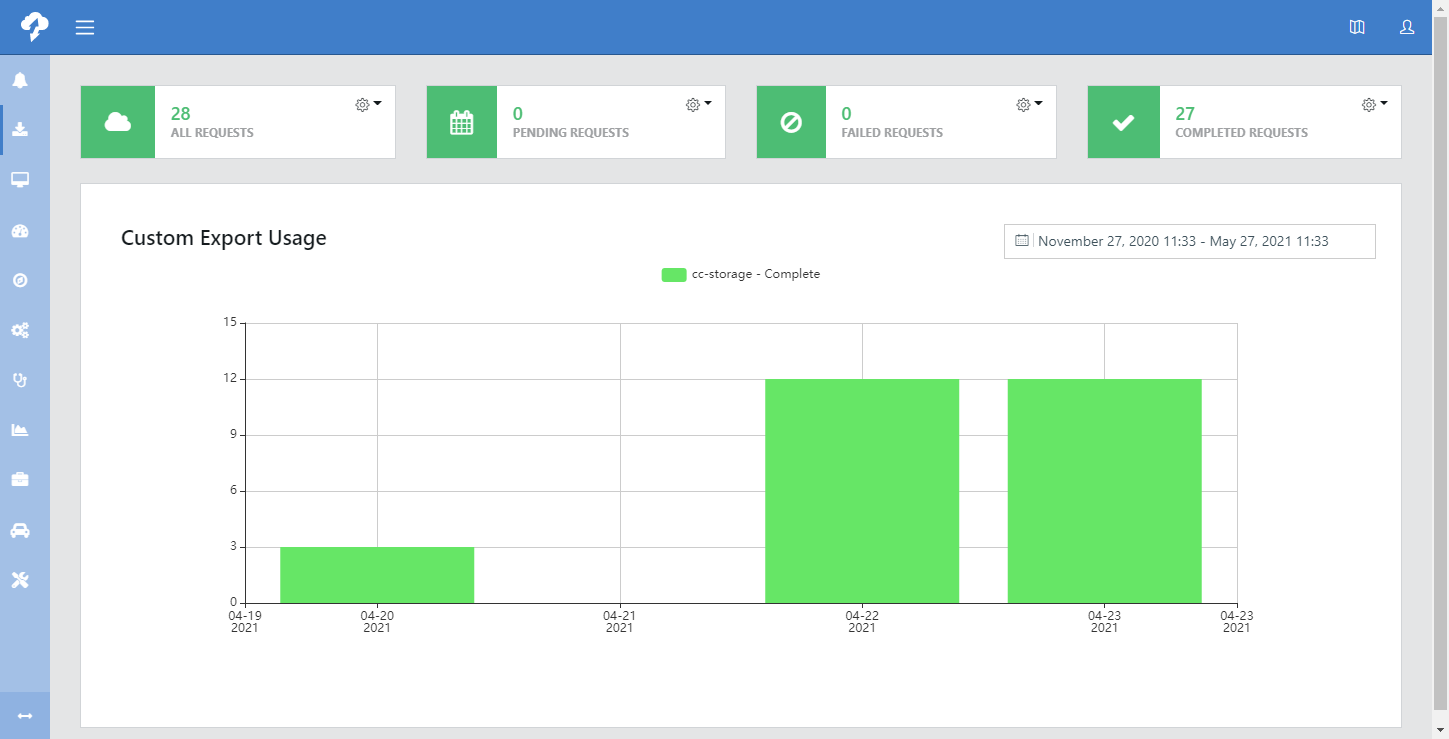
The top boxes on the Custom Export Dashboard show counts of:
-
All Requests
-
Pending Requests
-
Failed Requests
-
Completed Requests
Use the gear drop-down arrows to display the corresponding requests.
The Custom Export Usage graph shows the number of custom exports completed over the time period specified.

-
Click the gear icon in the All Requests box. Select Create New Requests.
-
Under Select a station, select the station to include in your data export from the drop-down menu.
-
Select the measurement(s) to include in your data export. Click Select All to include all measurements in the report. Use Display sensor name to toggle the measurement selection list between the aliases and the raw variables. (See Measurements for information on setting/changing aliases.)
-
To include multiple stations in your data export, click Add Station Configuration and repeat steps 2 through 3 for each additional station. (You may include as may stations as needed.) After adding all stations, click Next to continue to the next tab.
-
Click Now/Single to create a single request that is exported now, or Later/Repeating to create a request for later or a request that repeats on a specified interval.
-
Type a name and optional description for your export. Click Next.
-
 (Option 1) To configure a Now/Single export that ends at the current time:
-
Click Relative Range.
-
Under I Want, type the amount of time to be included in the export and select the unit of measure for time in the drop-down menu.
-
(Optional) Select Adjust data range to top of the hour to have the selected time range applied at the previous top of the hour.
Example with this option selected: It is currently 9:15 a.m. You have requested the previous 6 hours of data. Data will be exported for the 3:00 a.m. - 9:00 a.m. time range.
Example with this option not selected: It is currently 9:15 a.m. You have requested the previous 6 hours of data. Data will be exported for the 3:15 a.m. - 9:15 a.m. time range.
-
Select the time zone of the station for which the data is being requested.
NOTE:The data time stamps in the data export will be displayed in the selected timezone. If you have multiple stations included in the export and they are in different timezones, the recommended timezone is Etc/UTC (UTC - Coordinated Universal Time).
-
The time range as configured for your export will be displayed in the box on the right. Click Next.
-
-
 (Option 2) To configure a Now/Single export for a specific time range:
-
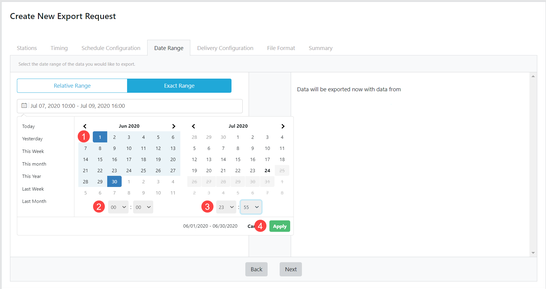
Click Exact Range.
-
Click on the calendar field to enter the start and end of the time range.
To enter the time range:
- Click on the calendar to indicate start and end dates.
- Specify the start time.
- Specify the end time.
- Click Apply to confirm your selection.

-
Select the timezone of the station for which the data is being requested.
NOTE:The data time stamps in the data export will be displayed in the selected timezone. If you have multiple stations included in the export and they are in different timezones, the recommended timezone is Etc/UTC (UTC - Coordinated Universal Time).
-
The time range as configured for your export will be displayed in the box on the right. Click Next.
-
-
 (Option 3) To configure a Later/Repeating export
-
Use How often would you like your export delivered? to specify the interval for the export.
-
For a weekly export, select the day of week for the export.
-
For a monthly export, specify whether the export will occur at the First of Month, Middle of Month, or End of Month.
-
Click the calendar and select the start date for the export. Enter the start time.
-
Click the calendar and select your end date for the export. Enter the end time.
NOTE:The start and end dates/times specify when the scheduled exports will first and last be processed. They do not specify the start and stop time for the data to be included in the export.
-
Click Next.
-
Under I Want, type the amount of time to be included in the export and select the unit of measure for time in the drop-down menu.
-
(Optional) Select Adjust data range to top of the hour to have the selected time range applied at the previous top of the hour.
Example with this option selected: It is currently 9:15 a.m. You have requested hourly data. The first data export will be for the 8:00 a.m. - 9:00 a.m. time range.
Example with this option not selected: It is currently 9:15 a.m. You have requested hourly data. The first data export will be for the 8:15 a.m. - 9:15 a.m. time range.
-
Select the time zone of the station for which the data is being requested.
NOTE:The data time stamps in the data export will be displayed in the selected timezone. If you have multiple stations included in the export and they are in different timezones, the recommended timezone is Etc/UTC (UTC - Coordinated Universal Time).
-
The date range, interval, and first export range for the export will be displayed in the box on the right. Click Next to continue to the next tab.
-
-
Click CAMPBELL CLOUD to deliver the export to the Requests page where you can download it. Alternatively, click Add to set up delivery to email, an S3 bucket, or an FTP site. Click Next to continue to the next tab.
NOTE:All exports will be delivered to the Requests page; adding one of the other options will be in addition to it being available for download from the Requests page.
-
Click CSV.
-
Type a customized file name for your export. (This is optional.) Right-click to access the Insert Placeholder pop-up to include the station name, station ID and/or request time in the file name. Do not include spaces in the file name. Click Next to continue to the next tab.
-
Click Submit to submit the custom export request.
-
You will be automatically redirected to the Requests dashboard.