Clock/Program Tab
When PC400 is opened, the main window is displayed with the Clock/Program tab active. Your datalogger stations will be represented on the left side of the window. (If no dataloggers are shown, you will need to configure your station(s) for communication using the EZSetup Wizard.). The top right portion of the main window shows buttons that, when pressed, launch the applications in PC400.
To communicate with a datalogger, on the Clock/Program tab select the datalogger with the mouse and press the connect button ( ). Once communication is established, the icon on this button will change to
  which can then be used to disconnect from the datalogger. When communication is established, the two remaining tabs, Monitor Data and Collect Data, will become available. Communication will also be indicated by the update of the Datalogger Clock fields and the status indicator on the bottom right of the window. When this status indicator is Green, PC400 is communicating with the datalogger. A timer will be displayed, indicating the amount of time PC400 has been communicating with the station. When the status indicator is Red, communication has failed. When it is Yellow, an attempt to communicate with the datalogger is in progress.
Current Datalogger Profile
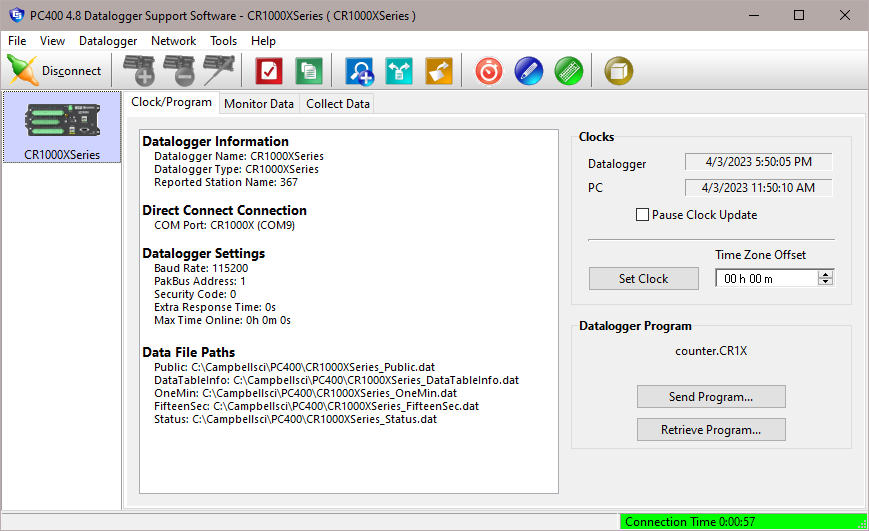
The left side of the Clock/Program tab lists all of the dataloggers that have been set up for communication with PC400. When a datalogger is selected (evidenced by a blue box surrounding the picture of the datalogger), summary information for that datalogger will be displayed.
Press the connect button ( ) to establish the communication with the selected datalogger. If your system is not set up properly and communication cannot be established, an error message will be displayed. Ensure that all cables are secure, power is supplied to the datalogger, the proper COM port is selected, and no other software or device is using the COM port.
Press the add button (  ) to open the EZSetup Wizard. This wizard will walk you through setting up communication with a new datalogger station.
A datalogger can be deleted from the Clock/Program tab. Highlight the datalogger you want to delete with the mouse pointer, and then press the delete button ( ![]() ). You will be asked to confirm the deletion of the datalogger.
). You will be asked to confirm the deletion of the datalogger.
The name of a datalogger can be changed to a new name. Select the desired datalogger with the mouse pointer, and then select Network | Rename Datalogger. The datalogger's name field will be highlighted; type in a new name over the old.
The current communication settings for a datalogger can be changed by highlighting that datalogger and pressing the edit button (  ). This will open the EZSetup wizard. If you know the window that contains the setting you want to change, you can select that window from the Progress portion of the wizard and jump to that window immediately, without going through the preceding steps.
Datalogger Clock
The Datalogger Clock portion of the Clock/Program tab displays the current time and date of your datalogger and the current time and date of your computer. You can synchronize the datalogger clock with the computer clock by pressing the Set Clock button. You can stop the clock updates by selecting the Pause Clock Update check box. Pausing the clock update may improve performance on slower communication links, because fewer commands will be sent to the datalogger from the software. Note, however, that CR10(X), CR500/510, CR23X, CR7, and 21X dataloggers will time out and drop the communications link if no communication takes place with the datalogger for 40 seconds.
The datalogger clock can be offset from the computer clock in one hour increments, up to plus or minus 23 hours. Use the up arrow or down arrow to select an offset, in hours, (or type in a new value over the old), then press Set Clock to implement the change.
Datalogger Program
This portion of the Clock/Program tab indicates the name of the program running in the datalogger and is used to send a new program to the datalogger. To send a new program, press the Send Program button. A dialog box will be displayed. Search for and highlight the program you want to transfer to the datalogger and choose Open. A message will be displayed asking you to confirm the program send operation.
The program running in a datalogger can be retrieved and stored to a file on the PC by pressing the Retrieve Program button. Note that this option is not available for CR200 dataloggers, because the running program is a compiled binary image.
CR10X, CR510, CR23X, CR10, CR7, and 21X dataloggers (with the default, mixed-array OS) will also have an Associate Program button. When pressed, this button displays a browse dialog box from which to select a DLD file to associate with the datalogger. PC400 will assign input location labels from the DLD file displayed in this field to the values on the Monitor Data tab.
WARNING: Downloading a new program to the datalogger can erase stored data!
The output tables in table-based dataloggers will be reset to 0 records (e.g., data erased). The data in mixed-array dataloggers will be erased if memory reallocation is required to accommodate the new program.
You should always collect any uncollected data from the datalogger before initiating a program transfer.