Web Security
Users and their website access rights are controlled through user accounts. Note that user accounts control access to websites as well as direct access to data sources and dataloggers using the API commands described in the manual.
Each user can be given one of the following access levels:
- None – No access is allowed. The account is disabled.
- Read Only – Allowed to view data. No values can be changed.
- Read/Write – Allowed to view data, make changes to writeable values in a datalogger’s Public or Status table or a virtual data source, and set a datalogger’s clock.
- All – Allowed to view data, make changes to writeable values in a datalogger’s Public or Status table or a virtual data source, set a datalogger’s clock, use the API FileControl command, and publish websites.
PC Websites
In order to publish a website to the CSI Web Server, a user account must be created. The root directory and each remote folder under the root directory can have its own user account. This user account controls the ability to publish projects to that directory and controls user access to websites in that directory. In order to publish, a user account needs to be assigned an access level of "all".
If a remote folder does not have its own user account, the root user account will be used.
For PC Websites, there is a default user account which includes one user:
Username: anonymous
Password:
Access Level: None
If a root user account has not been created, this default user account will be used for the root directory and any remote folder that does not include its own user account.
The CSI Web Server Administrator is used to create and edit user accounts.
Using the CSI Web Server Administrator to create and edit user accounts
To create the user account in the root directory, press the keys icon next to "Root". To create a user account for a new remote folder press the + icon next to "Root", enter a name for the site, and press Add Subdirectory. Once the new subdirectory appears under "Root", press the keys icon next to the subdirectory to create the user account for that subdirectory. The key icons can also be used later to edit the user account. Note that when editing a user account, you will not be able to see the current password. You will only be able to create a new one.

NOTE: Note: A lock icon next to a site indicates that there is not a user account with at least read only access to that site. Therefore, it cannot be accessed.
![]()
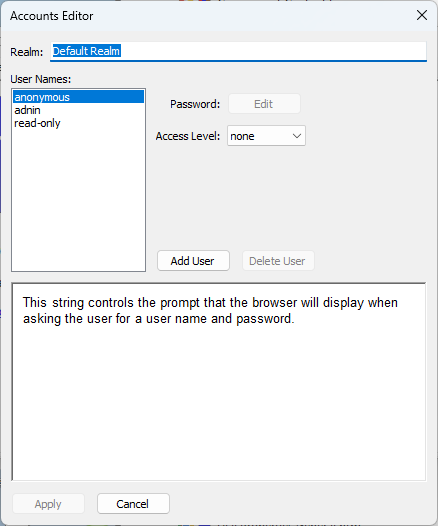
The Accounts Editor dialog box that is opened when the keys icon is pressed has the following fields:
- Realm - The name given to this realm. (A realm is a collection of user names and their access levels.) The name will be used in the prompt the browser displays when asking the user for a user name and password.
- User Names - Shows the users that are currently defined in this realm. Press Add User to add a new user. Select a user name in the list and press Delete User to remove that user.
- Password – The password for the selected user.
- Access Level – Sets the access level for the selected user.
- None – No access is allowed. The account is disabled.
- Read Only – Allowed to view data. No values can be changed.
- Read/Write – Allowed to view data, make changes to writeable values in a datalogger’s Public or Status table or a virtual data source, and set a dataloggers clock.
- All – Allowed to view data, make changes to writeable values in a dataloggers Public or Status table or a virtual data source, set a dataloggers clock, use the API FileControl command, and publish websites.
After defining the desired user names and access levels, click Apply to apply the changes. You can also click Cancel to discard the changes.
Datalogger Websites
Device Configuration Utility (DevConfig) must be used to create and edit datalogger user accounts. This is done by connecting to the datalogger in DevConfig and then pressing the Edit Accounts button on the Network Services tab. Define the user names and access levels you want to be available and press the Apply button.