Task Master
The Task Master is used to set up a Task that can be run on a defined schedule or based upon a data collection event from a datalogger. A Task can be data collection from another datalogger, FTP of a collected file, or anything that can be executed in a computing environment (i.e., a command line operation, a program executable, a batch file, or a script).
NOTE: When running LoggerNet as a service, tasks being run by the Task Master cannot interact with the desktop. Therefore, any tasks set-up in the Task Master should not require any user interaction.
NOTE: By default, when running LoggerNet as a service, the service is run under the LoggerNet user account. The LoggerNet user has write access only to the CampbellSci directories. Therefore, if a task requires something to be written or done in a different directory or on the desktop, the LoggerNet user does not have sufficient access and the process will end in an error. This can be solved by giving the LoggerNet user write access to the necessary directories. Click Issues with Running LoggerNet as a Service for more information.
NOTE: The Task Master was integrated into the LoggerNet server in LoggerNet 4.2. Integrating the Task Master into the server involved extensive changes. When upgrading to LoggerNet 4.2 from a previous version, an attempt will be made to import all previously-configured tasks. However, imports have only been tested back to LoggerNet 3.4.1. After upgrading (from any previous version of LoggerNet), you should verify that all of your tasks have imported correctly.
The Task Master is opened by selecting Task Master from the Toolbar's Main category or from LoggerNet’s Launch | Main | Task Master menu item.
When the Task Master is opened, there are two tabs. The Setup tab is used to define the tasks to be run. The Status tab is used to view the last time a task was run, the next time it will be run, and to run a task outside of its defined schedule.
Setup Tab
Add Scheduled
To execute a task on a defined schedule, choose the Add Scheduled button. A Task item will be added to the list of stations and tasks. The schedule can be set up on an interval or based on the calendar. Select which kind of schedule to set by selecting the Interval or Calendar radio button. Then define the schedule for the task by completing the fields as described below.
Interval
Base Date - The first date on which the task should be executed. If the date entered has already occurred, the task will be run on the next occurrence of the event interval and base time.
Base Time - The time on which each execution of the task should be based.
Schedule Interval- How often execution of the task should occur.
For example, to execute a task at 12:30 p.m. daily, set the Base Time at 12:30 p.m. and the Schedule Interval at 1 day.
Calendar
Set the Hours of the Day, Minutes of the Hour, Days of Month, Days of Week, and Months on which the task should be executed. The task will run when ALL of the specified settings are met. If a setting is left blank, it will always apply.
For example:
To execute a task on the first day of every month at 8:00 a.m., set the Hours of the Day to 8, the Minutes of the Hour to 00, the Days of the Month to 1, and leave the other settings blank.
To execute a task every Tuesday at 6:15 a.m., set the Hours of the Day to 6, the Minutes of the Hour to 15, the Days of the Week to 3-Tuesday, and leave the other settings blank.
To execute a task on the first Monday of every month at midnight, set the Hours of the Day to 00, the Minutes of the Hour to 00, the Days of the Month to 1, 2, 3, 4, 5, 6, 7, the Days of the Week to 2-Monday, and leave the other settings blank.
To execute a task on the fifth day of every quarter at midnight, set the Hours of the Day to 00, the Minutes of the Hour to 00, the Days of the Month to 5, the Months to 1-January, 4-April, 7-July, 10-October, and leave the other settings blank.
After specifying the desired schedule, press the View Schedule button to bring up a calendar that shows the current defined schedule. Verify this is the desired schedule. (You can zoom in on an area of the schedule by dragging your mouse from top-left to bottom-right.)
Add After
To execute a task based on a data collection event, select the station from the Task and Stations list and press the Add After button. A Task item will be added to the list of stations and tasks. Define the condition under which the task should be executed using the Station Event Type drop-down list box.
NOTE: Many of the tasks will be triggered by scheduled collection or by using a Collect Now button, or by another task that calls the associated station. (Collect Now buttons are found on the Status Monitor and on the Connect Screen.)
NOTE: Using Custom Collect from the Connect Screen will not trigger any tasks.
-
After Any Scheduled Call - After a scheduled data collection attempt, regardless of whether or not the call is successful. The task is triggered only by a scheduled collection.
-
After Successful Call - After a successful scheduled data collection, after using a Collect Now button successfully, after a call-back, or after another task that calls the associated station successfully.
-
After Failed Scheduled Call - After a scheduled data collection fails, after using a Collect Now button unsuccessfully, or by another task that calls the associated station unsuccessfully.
-
After Any Call - After a scheduled collection, after using a Collect Now button, after a call-back, or after another task that calls the associated station. The task is triggered regardless of whether or not the data collection was successful
-
After Some, Not All, Data - After some, but not all data is collected during a scheduled collection, when using a Collect Now button, or when another task calls the associated station.
-
On Call-Back - When a call-back attempt is detected. This option does not wait for data collection to finish. The task is triggered by a call-back from a datalogger executing a P97 instruction or a SendVariable instruction.
-
After Call-Back - When a call-back attempt is completed and data is collected. Even if data collection fails part way through the call, the task will be run. The task is triggered by a call-back from a datalogger executing a P97 instruction or a SendVariable instruction.
-
After Failed Retry - Whenever a retry fails. This can be the failure of a primary retry, a secondary retry, or a retry using a Collect Now button. (Scheduled collection failures and “Collect Now” failures both increment the same retry counter.)
-
After Primary Retries Failed - After the specified number of primary retries has been exhausted. The task is triggered by a failure of primary retries from scheduled collection or from using a Collect Now button. (Scheduled collection failures and “Collect Now” failures both increment the same retry counter.)
-
After One Way Data - After data is received from a datalogger executing a SendData instruction or when data is collected via Data Advise.
-
After File Closed - After any data file being written to is closed. The task is triggered by a scheduled collection or by using a Collect Now button. A datalogger call-back, One Way Data, Data Advise, or another task that calls the associated station, which causes a file to be written to and closed, will also trigger the task.
The option %f can be used in the command line options to represent the just closed data file. This condition is especially useful when performing post-processing on a data file that has been created using Create Unique File Name as the File Output Option. In this case the user does not know the file name ahead of time. Therefore, the %f option can be used to insert the file name in the command line options.
NOTE: %f returns an unquoted string. Therefore, if there are spaces in the path or filename, you will need to add quotes around the %f.
-
After Any Data Collected - After data is collected by any means, and the call is terminated for any reason (success or failure). The task is triggered by a scheduled collection, by using a Collect Now button, a datalogger call-back, or another task that calls the associated station which causes any data to be collected.
-
After File Retrieved - After a file is retrieved based on the datalogger’s File Retrieval tab in the Setup Screen.
When the station’s File Retrieval Mode (on the Setup Screen’s File Retrieval tab) is set to Follow Scheduled Data Collection, the task is triggered by a scheduled collection, by using a Collect Now button, by a datalogger call-back, or by another task that calls the associated station and causes a file retrieval. An attempt to retrieve the file(s) will be made at the scheduled time, only if scheduled collection is enabled. However, when a manual poll/Collect Now is performed, an attempt to retrieve the file(s) will be made regardless of whether scheduled collection is enabled or not.
When the station’s File Retrieval Mode is set to New Schedule, only the new schedule will trigger file retrieval and thus, the task. Attempts to retrieve the file(s) will be made following the new schedule, whether scheduled collection is enabled or not.
An "Add After" task can also be added to an existing task. In this case, the only fields applicable are the What Task Does information.
What Task Does
This tab describes the task that will be performed. Select a tab to set up the action(s) that should be performed by the task. If multiple check boxes (Execute File, Call Station, FTP Settings) are selected, the actions will be launched at the same time.
Execute File - Select this check box to execute a file or command when a task event is triggered. Use the browse button to the right of the File Name field to select the file, or type in the name and path directly. If command line options should be passed to the executable, enter those into the Command Line Options field. A Start In Directory for the executable can be typed in directly, or you can browse for it. Select theRun Minimized check box to have the file executed in a minimized state. When minimized, it will appear as a Windows taskbar item but will not open on your desktop.
The File Name, Command Line Options, and Start In fields can contain these predefined symbols that will be expanded by the LoggerNet server:
|
%a |
LoggerNet working directory. (By default, C:\Campbellsci\LoggerNet.) |
|
%w |
LoggerNet server working directory. (By default, C:\Campbellsci\LoggerNet\sys\bin.) |
|
%b |
LoggerNet program directory. (By default C:\Program Files (x86)\Campbellsci\LoggerNet for 64-bit computers and C;\Program Files\Campbellsci\LoggerNet for 32-bit computers.) |
|
%s |
Name of the station that triggers the task. |
|
%f |
Name of the data file when the task is triggered by the closing of a data file (that is, by the After File Closed condition). See After File Closed above for more information. (Note that %f returns an unquoted string. Therefore, if there are spaces in the path or filename, you will need to add quotes around the %f.) |
|
%% |
Substitutes a percent character in the path. |
NOTE: Always enter the full path when specifying the file to execute. Otherwise, the file may not be found or may not run as expected.
NOTE: The Task Master can process only one command in a command line. If multiple commands are required, place the entire command sequence in a batch file and execute the batch file from the Task Master. (If you are running Windows as a restricted user or if you are running LoggerNet as a service, you must explicitly set all file paths in the batch file.)
NOTE: The Task Master may not be able to process certain characters on a command line, such as the redirect (<) character. Use the Window's cmd function with the /c option to process the command (e.g., cmd /c ""cora_cmd <run.script"). The cmd function will carry out the command in the subsequent string and then terminate. You can also put the command line in a batch file and then start the .BAT file from the Task Master.
Call Station - Select this check box to trigger a call to a station when a task event is triggered. Data will be collected according to settings in the Setup Screen for the datalogger. Use the drop-down list box to select the station that will be called.
FTP Settings - This check box is only available when configuring an Add After task with the Station Event Type set to After File Closed or After File Retrieved. Select the Enable FTP check box to transfer the file to a designated FTP directory with the following settings:
-
Host Address - The FTP server to which the file will be sent.
-
User ID - The username on the FTP server.
-
Password - The user’s password on the FTP server
-
Remote Folder - Selects the folder on the FTP server to which the file will be transferred. The file will be saved to this folder under the FTP server’s FTP root directory. Press the button to browse to the desired directory.
-
FTP Protocol - Use the check box to select the FTP Protocol to use. The options are FTP (File Transfer Protocol), SFTP (SSH FTP), and FTPS (FTP over TLS).
-
FTP Queue Size - If an FTP fails for some reason, the file can be queued up to be sent in the future when the issue that caused the failure has been resolved. An FTP will only be attempted each time the task is triggered.
The FTP Queue Size determines how many files the Task Master will keep in the queue to attempt to FTP again.
-
Extended Passive Mode - Select the EPSV Enabled checkbox to enable the EPSV (extended passive mode) command instead of the PASV (passive) command for FTP.
PASV is limited to IPv4, while EPSV works with any network protocol. However, since EPSV is an extension of PASV, it is not necessarily supported by all FTP servers. Therefore, this checkbox must be checked if the FTP server is using IPv6. Otherwise, it should be checked only if you are certain the FTP server supports EPSV.
Any data file associated with the designated station will be transferred, whenever that file is closed. (Therefore, a table’s File Output Option on the Setup Screen’s Data Files tab must be set to anything but “No Output File” in order for the table’s collected data to be transferred.) If more than one file is closed (i.e., multiple tables are collected and written), all of the files are transferred. If a failure occurs, the failure information will be written to the log file described below.
NOTE: When the Task Master’s Pause All Tasks option is selected, no tasks will be triggered. Therefore, any files that would have been FTP’d, if tasks were not paused, will not be added to the FTP Queue.
NOTE: It is not ideal to set up an FTP task with a datalogger on a fast scheduled collection interval, because of the time it can take an FTP transaction to occur.
Example #1:
The following configuration will run Splitr.exe and process the parameter file named mendon monthly.par. If your parameter file name includes spaces (as with the example shown below), you will need to put quotes around the entire string or an error will be returned.
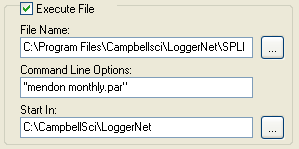
The Start In directory indicates the directory in which the Split parameter file is found.
NOTE: When running Splitr.exe as a task, caution should be used when using the Run Minimized option or when running LoggerNet as a service. Splitr.exe will remain running after the first execution of the task. At that point, Splitr.exe will not run again, until you close it through the Windows Task Manager. The only way to successfully run Splitr.exe in a minimized state or when running LoggerNet as a service is to use the /R or /Q option immediately after the PAR file name (with no space) to close Splitr.exe after the PAR file is run. With the /R option, Splitr.exe will remain open if an error occurs and will not run again, until the error is acknowledged. With the /Q option, you will get no indication if an error occurs. You will need to check Split’s log files for information on any errors that have been generated. The /Q option should always be used when LoggerNet is running as a service.
Example #2:
The following configuration will run LNBackup.exe to perform an automated backup. The -AppendTime command line option creates a unique filename based on date and time each time the task is run. If the -AppendTime command line option is omitted, the backup file will be overwritten each time the task is run.
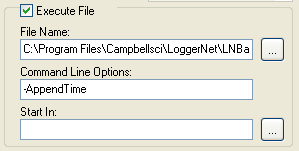
If LoggerNet security is enabled, the command line options must also include the username and password as shown below:
-user=”username” -password=”password”
If you have used a Command Line Arguments to change LoggerNet’s default port number, the command line options must also include the server address and port number as shown below:
-server=server_address:port (e.g., LocalHost:6700, 192.168.7.123:6700, or [2620:24:8080:8600:85a1:fcf2:2172:11bf]:6700)
NOTE: The files contained in the backup will be based on a saved backup configuration file. To save a backup configuration, choose Network | Manual Backup from the Setup Screen’s menu. Proceed through the Backup wizard. At the last step, choose Save Configuration. The configuration will be saved to C:\CampbellSci\LoggerNet\Backup.Configuration.
NOTE: Automated backups on a specified interval can be performed using the Setup Screen’s Network | Scheduled Backup menu item.
Example #3:
The following configuration will set up a task (calendar_data_collection_task) to collect data from the datalogger that is named CR1000_IP in the network map. Data will be collected at 8:00 a.m. and 5:00 p.m. Monday-Friday. Note that the Data Files tab in the Setup Screen must be configured to collect the desired tables.
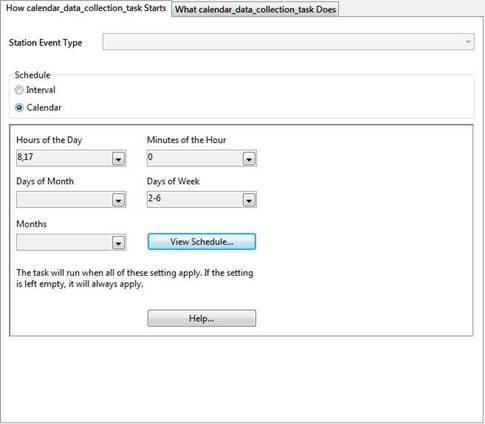
NOTE: 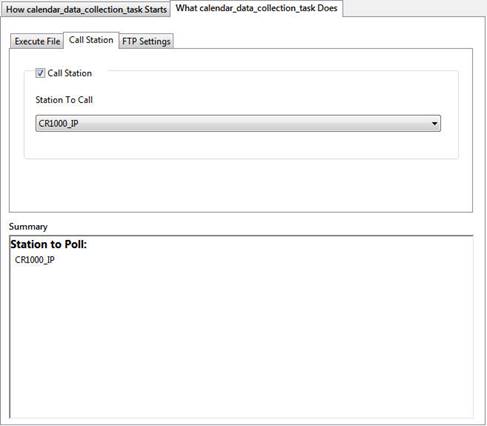
Example #4:
The following configuration will set up a task to perform a clock check on the datalogger that is named CR1000_IP in the network map.
NOTE: 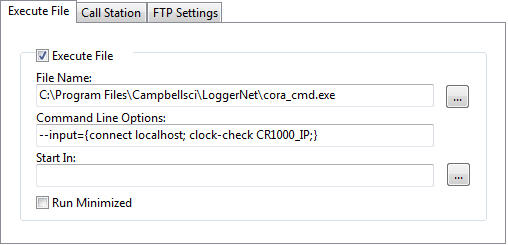
Status Tab
The Status tab for the Task Master provides information on the type of task, the last time a task was run, the next time it will be run (if it is a scheduled task), and the outcome the last time the task was run.
By default, all columns are shown on the Status tab. You can select which columns are shown by choosing Edit | Select Status Columns from the Task Master menu or by right-clicking on the column headings on the Status tab and selecting Select Status Columns.
Task Name - The name that was given to the task when it was set up.
Action - Indicates whether the task will Call Station, Execute File, FTP File, or perform Multiple actions.
Event Type - This column indicates what type of event will trigger the task. It is only applicable to Add After tasks. The event types are those listed above (Station Event Types).
Event Trigger – For a Scheduled Interval task, the schedule for the task will be listed in the format DD HH:MM:SS followed by the word "Interval". For a Scheduled Calendar task, the word “Calendar” will be displayed. For an Add After task, the device which the task is dependent upon will be listed.
Last Time Run - The last time that the task was run by LoggerNet.
Next Time to Run - The next time that the task is scheduled to be run. If the task is not a scheduled task (interval or calendar), this field is not applicable and will be left blank. If Pause Tasks is selected, this field will read Paused.
Pending Actions - Species the number of actions that are currently pending for this task. This value will be zero if there are no actions currently pending. An increasing number may indicate that you are attempting to run the task faster than is possible.
Last File Run Started - The last time the attempt to execute the file was started.
Last File Run Finished - The last time the attempt to execute the file was finished.
Last File Run Outcome - The outcome of the last attempt to execute the file. This can have one of the following values:
-
Failed
-
Started
-
Does Not Exist
-
Timed Out
Last File Run Exit Code – Windows system exit code of the last attempt to execute the file.
Last Poll Started - The last time that polling of the specified station was started.
Last Poll Finished - The last time that polling of the specified station was finished.
Last Poll Outcome - The outcome of the last poll. This can have one of the following values:
-
Not Polled
-
Success
-
Security Failure
-
Communication Failure
-
Communications Disabled
-
Bad Table Definitions
-
Task Disabled
-
Datalogger is Locked
-
File Write Failure
-
Datalogger is not Valid
Last FTP Started - The last time the attempt to FTP a file was started.
Last FTP Finished - The last time the attempt to FTP a file was finished.
Last FTP Outcome –Outcome of the Last FTP attempt. This will have a value defined under Exit Codes here:http://curl.haxx.se/docs/manpage.html
Run Selected Task - Press this button to immediately execute the highlighted task.
Pause All Tasks- Select this check box to temporarily stop the execution of all tasks.
Remote Administration of the Task Master
(available only in LoggerNet Admin/LoggerNet Remote) The File | Select Server option allows you to select the LoggerNet server to which the Task master should connect. You also specify the username and password to be used.
For remote administration of the Task Master, the following conditions must be met:
-
LoggerNet security must be enabled in the Security Manager, and the user must have Full Administrator credentials.
-
Allow Remote Task Management must be enabled from the Security Manager's Edit menu.
-
Allow Remote Connections must be enabled in LoggerNet Options.
Task Master Logs
Messages about the activity of tasks are saved in LoggerNet's transaction log files. They show information about when a task is set up and when a task is executed. The Task messages are interspersed with other server messages in the tran.log files.
For FTP tasks, an additional log file, FTPLastTx.log, will provide details about the last FTP task that was run. It will be overwritten with each FTP event.
By default, the log files are stored in C:\Campbellsci\LoggerNet\Logs.