Numeric Display
Real-time data and final storage data can be viewed on the Numeric Displays. There are three displays that can be set up with different data points. By default, each display has 3 columns of 18 cells.
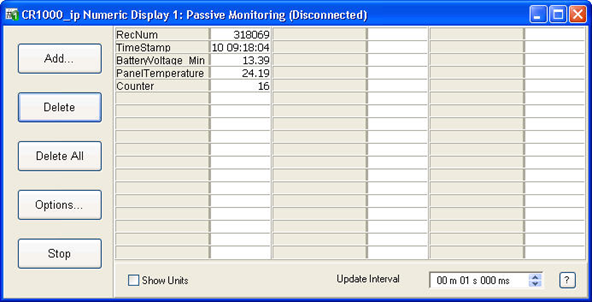
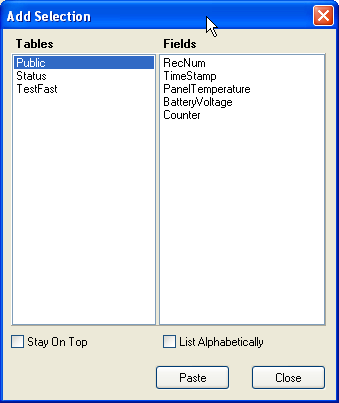
Press the Add button to bring up the Add Selection dialog box which displays a list of data values that can be viewed on the Numeric Display. Tables and other collection areas are displayed on the left side of the dialog box. When an item is selected in the left hand column, the input locations, variables, or data table fields associated with that item are displayed on the right. These values can be dragged from the list and dropped on to a cell in the Numeric Display, or you can highlight a value, highlight the cell in which to place it, and then press Paste. An existing data value on the Numeric Display can be dragged and dropped to a different cell if desired. Additionally, for dataloggers with a mixed-array operating system, you can press the
Highlight cells and press the Delete button to remove data values from the display.
Press the Delete All button to remove all data values from the display.
The Options button can be pressed to configure various display, alarm, and setup options for each cell.
If desired, select the Show Units check box to display any units that have been assigned to data values being displayed.
The Start button must be pressed to begin monitoring the data values. The name of this button then changes to Stop, and it can be pressed to stop monitoring the data values.
The arrow to the right of the buttons can be pressed to hide the buttons and allow more room for the data grid. The arrow button will change direction and can then be used to restore the buttons.
The font size on a Numeric Display cannot be changed directly. However, you can drag a corner of the Numeric Display window to resize it. This will also cause the font to be resized to correspond to the new window size.
NOTE: The timestamps on input locations for mixed-array dataloggers are a combination of the time retrieved from the datalogger and LoggerNet’s date. With even a slight difference between the LoggerNet clock and the datalogger clock, this can result in data that is incorrectly timestamped for data points close to midnight.
NOTE: Timestamp and RecNum are special field names used by the Numeric Display to display the timestamp and the record number. If TimeStamp or RecNum is used as a variable name in your program, that variable cannot be displayed on a Numeric Display.
If your mouse pointer is left over a cell for a few seconds, the table name and field name for the data value will be displayed.
The values of input locations (or variables) and the state of ports and flags can be changed using the Numeric Display. To edit an input location value, double-click the displayed value, enter the new value, and press the Enter key. The state of a port or flag can be changed by clicking the LED icon to the right of the field value. A black LED indicates that the port or flag is low; green indicates that it is high.
When a value is enabled for editing, if the ESC key is pressed, the change will be canceled.
Right Click Menu Options
Press the right mouse button when your cursor is within a cell to display a short cut menu. This menu contains short cuts for the Add, Delete, Delete all, and Options buttons, as well as a Rename menu item that enables a label for editing, a Select All menu item that highlights all of the cells in the Numeric Display, a View/Modify Value menu item that displays the value in a separate dialog box and allows you to change the value (if it is editable), and a Help menu item that brings up help for the Numeric Display.