Configuring a LoggerNet Server
The LoggerNet device type is configured using the LoggerNet server protocol rather than using the device configuration protocol. The dialog that is shown appears when you start the action of configuring a LoggerNet Server.

This dialog has the following controls:
-
Model Prefix - This field allows you to enter a string that will be placed at the beginning of the name for every device in LoggerNet's network map that the Network Planner generates. If specified, this value will appear in the names followed by an underscore character. This feature allows you to use several different Network Planner models with the same LoggerNet server by keeping the generated devices separate.
-
Server Address - This field specifies the IP address or domain name of the computer that is running the LoggerNet server. In order to configure LoggerNet on a remote computer, that instance of LoggerNet must allow remote connections and must also be reachable from the computer hosting the Network Planner.
-
User Name & Password - These fields allow you to specify the account that should be used when connecting to the LoggerNet server. The account used should have at least Network Manager privileges. If security is not configured on the server, these values will be ignored.
-
Remember Password - This check box can be checked (the default) if the user name and password specified should be saved as part of the information for the LoggerNet device in the model.
-
Connect - When this button is clicked, the Network Planner will initiate the connection to the LoggerNet server.
-
Cancel - If this button is clicked, the configuration dialog will be dismissed and the configuration attempt canceled.
-
Help Window - The HTML window in the upper right corner of the dialog shows context sensitive help about the control that has the current keyboard focus.
-
Generated Devices and Settings - The HTML window in the lower right corner of the dialog shows a summary of the devices that will be created in LoggerNet's network map as well as the settings associated with those devices. This summary is presented in an indented list form where the level of indentation depends upon device links. Since the dialog has not yet communicated with the server, this summary shows only the expected structure and does not reflect any devices in the actual network map.
If you click Connect in the Configure LoggerNet dialog, the Network Planner will attempt to connect to the specified server address and will log in using the specified user name and password. Once attached, the dialog will attempt to reconcile the structure and settings that it has generated with the structure and settings currently in LoggerNet's network map. The result of this reconciliation is a set of changes that will be made to the current LoggerNet network map. An example of this set of changes is shown below.
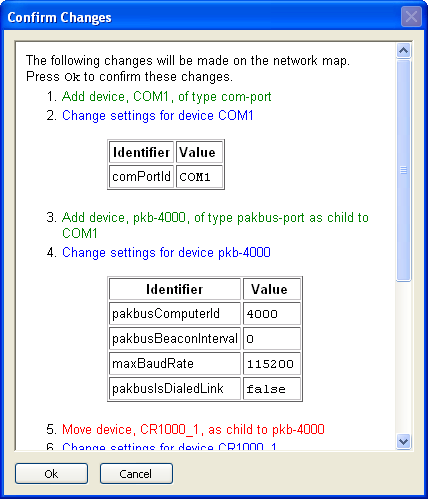
The colors of items in this dialog indicate the impact they may have on the operation of devices that are already in the LoggerNet network map.
These are coded as follows:
-
Green - The change is merely additive (adding new devices, for instance) and is unlikely to have any noticeable impact on the workings of existing devices.
-
Blue - The change involves making changes to settings of existing devices.
-
Red - The change will alter the structure of the network map and will relocate existing devices.
If it becomes necessary to delete an existing device in order to reconcile the LoggerNet network map with the generated configuration, an error will be reported. In order to avoid loss of data, the Network Planner will not delete any existing devices from the network map.