Sensor element replacement
Campbell Scientific offers a replacement temperature/RH element and cap for the HygroVue 5. The replacement element is only available from Campbell Scientific. It includes a small circuit board that is coated to ensure longer life at high humidity. A single row of four gold pins inserts into one side of an eight-way socket at the end of the sensor.
The replacement element must be correctly installed for the sensor to work properly. Follow these steps to correctly replace the element:
-
Wash your hands to avoid getting dirt or grease on the element. If possible, use cotton gloves and handle the element by the edges of the small circuit board. Avoid touching the square white filter on the surface of the small, black component on top of the circuit board.
CAUTION:If dirt, salt, or grease are left on the face of the sensor element during the process of handling the element, it may influence the measurements made.
-
Disconnect the sensor from the 12 V power supply.
-
Remove the filter cap by unscrewing it counter clockwise when looking towards the tip of the sensor.
CAUTION:Only unscrew the filter cap. Attempting to pull the filter cap off the sensor may damage the filter cap.
-
Identify the sensor element. The element plugs into the black plastic socket that protrudes by about 2 mm from the end of the body of the sensor.
-
Grasp the sensor body to ensure you are at the same electrical potential as the element. Hold the edge of the circuit board between your fingertips and pull the element out of the socket. Store the old element in electrostatic protective packaging if you wish to retain it. (Please avoid pink colored electrostatic bags, as they can emit chemicals which change the calibration of the sensor.)
-
With the element removed, check for dirt and corrosion around the socket. Use a damp cloth to remove dirt or salts that might have collected.
-
Unpack the replacement element, avoiding static discharges to the element by making sure you touch the packaging before the element.
-
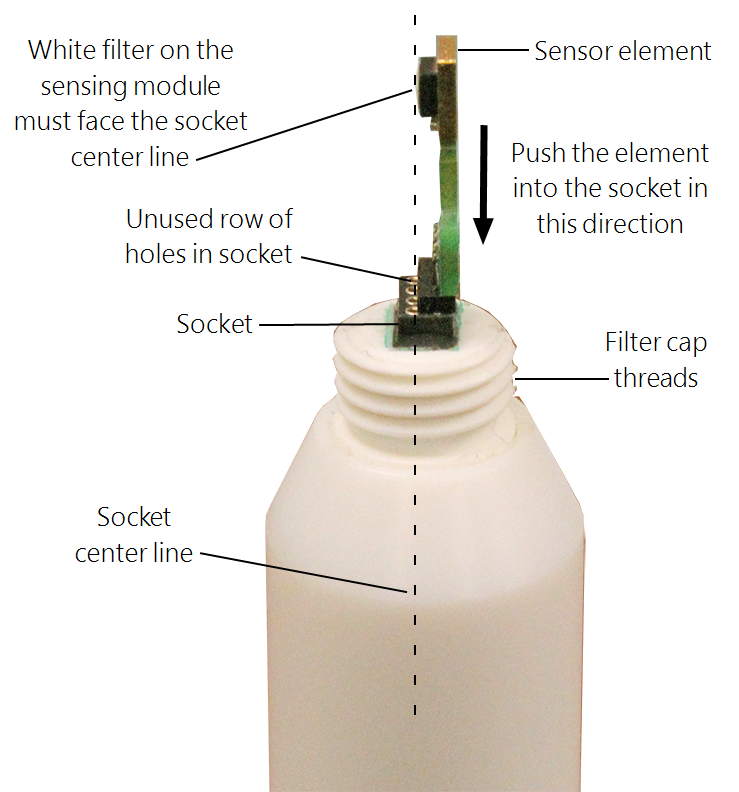
Hold the replacement element by the sides of the circuit board. The element has four gold pins. Carefully match the gold pins to a row of holes in the socket with the sensing module facing the socket center towards the empty row of holes (see Correct fit of the 4-pin sensor element (side view)). Gently push the pins down into the socket until they will not go in any further.
-
Before replacing the filter cap and turning on power to the sensor, double-check the element is seated correctly with the sensing module facing the socket center, towards the empty row of holes (see Correct fit of the 4-pin sensor element (side view)).
CAUTION:Conditions that will cause the sensor to not work include an improperly oriented element, contamination, or water bridging the connections. The element may draw excessive power, possibly damaging the element, when powered under these conditions for more than a few seconds.
-
Screw the filter cap onto the sensor, ensuring it clears the sensor element. If the element appears too close to the filter cap, the element likely has been inserted in the incorrect orientation, or the element gold pins are bent. Screw the filter onto the thread and gently finger tighten.
CAUTION:Only finger tighten the filter approximately 1/8th of a turn after the filter is fully screwed onto the thread. Over-tightening the filter will damage it and cause problems in inserting and removing the sensor from some shields.