Web Server/API Commands
CR1000X dataloggers support an ![]() HTTP Hypertext Transfer Protocol. A TCP/IP application protocol. API interface for accessing data from the dataloggers. The CGI-style request syntax is designed to be flexible and easy to use.
HTTP Hypertext Transfer Protocol. A TCP/IP application protocol. API interface for accessing data from the dataloggers. The CGI-style request syntax is designed to be flexible and easy to use.
While the following information specifically addresses directly accessing the web server in the datalogger, this API can also be used with Campbell Scientific's PC-based Web Server. In this instance, any data source defined in an RTMC project can be used (see https://www.campbellsci.com/rtmc for details on RTMC).
Enabling Security
The datalogger employs a security scheme that includes three levels of security and is enabled by setting an option in the datalogger’s Status table to a value in the range of 1 to 65534 (refer to the SetSecurity instruction). This scheme can be used to limit access to a datalogger that is publicly available. However, the security code is visible in ![]() Device Configuration Utility Configuration tool used to set up dataloggers and peripherals, and to configure PakBus settings before those devices are deployed in the field and/or added to networks.. In addition, the range of codes is relatively small. To provide a more robust means of security, Basic Access Authentication was implemented with the HTTP API interface in the form of an Account Manager. User accounts can be defined within this Account Manager, which enables basic access authentication for read/write access to the web interface. Multiple user accounts/levels of access can be defined for one datalogger. Four levels of access are available:
Device Configuration Utility Configuration tool used to set up dataloggers and peripherals, and to configure PakBus settings before those devices are deployed in the field and/or added to networks.. In addition, the range of codes is relatively small. To provide a more robust means of security, Basic Access Authentication was implemented with the HTTP API interface in the form of an Account Manager. User accounts can be defined within this Account Manager, which enables basic access authentication for read/write access to the web interface. Multiple user accounts/levels of access can be defined for one datalogger. Four levels of access are available:
- None: Disable a user account.
- Read Only: Data collection is unrestricted and available. Clock and writable variables cannot be changed; programs cannot be viewed, stopped, deleted, or retrieved.
- Read/Write: Data collection is unrestricted and available, and clock and writable variables can be changed. Programs cannot be viewed, stopped, deleted, or retrieved.
- All: Data collection is unrestricted and available, clock and writable variables can be changed; and programs can be viewed, stopped, deleted and retrieved.
The user accounts can be created or modified using Device Configuration Utility. Support for this Account Manager was added in Device Configuration Utility version 1.17. It is created from the Network Services tab, Edit Accounts button. After user accounts are defined and the Apply button is pressed, the accounts are automatically saved to the datalogger. When the Account Manager enables basic access authentication, the datalogger PakBus/TCP Password security setting is not used when accessing the datalogger via HTTP.
For OS versions prior to
When access to the datalogger Web Server is attempted without the appropriate security level, the datalogger will return a 401 Authorization Required response, which will prompt the Web client to display a user name/password request dialog. If an invalid username or password is entered, the datalogger Web Server will default to the level of access assigned to “anonymous”. As noted above, depending on the OS version, anonymous can have a default user level of read-only or none, though this can be changed using Device Configuration Utility.
If the older numeric security code has been enabled (1 – 65534 using SetSecurity or the Security() Status table settings) and no user accounts are on the datalogger, that numeric security code must be entered to access the datalogger. If a user account file is on the datalogger, the User Name and Password employed by the Basic Access Authentication will eliminate the need for entering the numeric security code.
Command Syntax
Syntax for commands sent to the web server generally follow the form:
URL?command=CommandName&uri=DataSource&arguments
Arguments are appended to the command string using an ampersand (&). Some commands have optional arguments, where omitting the argument results in a default being used. When applicable, optional arguments and their defaults are noted in the following descriptions.
When specifying the data source for a command, the URI may be omitted in instances where a tablename or fieldname is not used (i.e., URI=dl:). This is because when querying the datalogger directly, the datalogger is the top level data source and the URI is assumed.
A user name and password can be used as part of the command string. For example:
http://admin:12345@192.168.24.62/?command=setvalueex&uri=dl:public.Enter_string&value=15
where admin is the user name and 12345 is the password.
NOTE: Reserved characters in a password must be URL encoded. See URL Escape Codes.
Some commands return a response code indicating the result of the command. These are described (following) where applicable.
Data Access Commands
DataQuery
DataQuery allows a web client to poll the datalogger for data. The command returns one or more fields, or one or more records, from a table in the datalogger. DataQuery includes the following components:
URI
The URI specifies the data source for the query. When querying the datalogger directly, the data source is specified as dl:tablename.fieldname. For example, the data source for PTemp in a datalogger's Public table would be:
Uri=dl:Public.PTemp
Note that fieldname is optional. If omitted, all values in the table are returned.
Mode
The Mode specifies the timeframe for the data to be returned. Valid options are:
- most-recent – Returns the data from the most recent number of records. The number of records is specified by P1.
- since-time – Returns all the data since a certain time. The time is specified by P1.
- since-record – Returns all the records since a certain record number. The record number is specified using P1
- date-range – Returns the data in a certain date range. The date range is specified using P1 and P2.
- Backfill – Returns all the data that has been stored since a certain time interval (for instance, all the data since 1 hour ago). The interval is specified using P1.
P1/P2
P1 and P2 are used to set the time parameters for Mode:
- most-recent – The maximum number of records to return.
- since-time – The start time for the data. Format = YYYY-MM-DD T:HH:MM:SS.MS. Time (T) is optional; if only the date is specified, Time is assumed as midnight. When specifying time, MS is optional. The record matching the start time (P1) and anything greater is included in the response.
- since-record – The starting record number. The record matching the starting record number (P1) and anything greater is included in the response.
- date-range – The start time (P1) and end time (P2) for the data. Format = YYYY-MM-DD THH:MM:SS.MS. Time (T) is optional. If only the date is specified, Time is assumed as midnight. When specifying time, MS is optional. The record matching the start time (P1) is returned; the record matching the end time (P2) is not.
- Backfill – The interval, in seconds, for the backfill (for example, 3600 would be 1 hour).
Format
The Format is the format in which to return the data. Options are: html, json, toa5, tob1, xml.
As an example, to return the three most recent values from the PTemp variable in the OneMin table (i.e., most-recent) the command line would be:
http://192.168.4.14/?command=dataquery&uri=dl:onemin.ptemp&format=html&mode=most-recent&p1=3
For additional examples, see DataQuery Examples.
NOTE: If JSON is specified for the format parameter and the web server has a large data set to send, the web server may break the data into multiple requests by specifying a value of True for the MORE flag in the JSON output. If the MORE flag is present and set to true, another dataquery command should be issued to get the next (up to the last) set of data, using information from the last record to specify the beginning record for the next set of data.
For example, if a date-range command was issued and there is more JSON data, for the next date-range command you would revise the start date (P1) to begin at the date of the next record after the last record of the returned data set.
For data queries that don’t use P2, because the JSON data set will continue until the current record, the first data set gives the starting place after which you can use a since-record dataquery for the rest of the JSON data sets. Use P1 each time, set to one more than the last record returned until there is not a MORE flag. For example, if a most-recent dataquery command was issued and records 0 through 32 were retrieved and the MORE flag was true, the second dataquery can be a since-record dataquery with P1=33. Any additional dataqueries can be since-record queries.
When all of the records are contained in a JSON data set, there is no MORE flag present in the data set.
BrowseSymbols
The BrowseSymbols command is used to return all the tables in a datalogger, all the fields in a table, or all the elements of an array. BrowseSymbols includes the following:
URI
The URI specifies the name of the parent element for which to return the BrowseSymbol information. The format is dl:tablename.fieldname.
Format
The Format is the file format for the result of the command. Options are: html, json, or xml. The following information is returned:
| Return | Description |
|---|---|
| URI | The URI of the child element. |
| Name | The name of the child element in the datalogger. |
| Type | The type of the element. 6 = Table, 7 = Array, 8 = Scalar |
| Is_enabled | Boolean value which indicates whether the element is enabled for scheduled data collection (relevant only to LoggerNet data sources). |
| Is_read_only | Boolean value which indicates whether the element is read only. If not read only, the element can be changed using SetValueEx. |
| Can_expand | Boolean value that indicates whether the element has child elements. |
For additional examples, see BrowseSymbols Examples.
Control Commands
SetValueEx
The SetValueEx command is used to set a value in the datalogger. If user accounts exist on the datalogger, a username and password with Read/Write access must be entered (or previously entered in the same session) or the command will fail. SetValueEx has includes following:
URI
The URI specifies the value that should be set in the format of
dl:tablename.fieldname.
Value
The new value to which the URI should be set.
Format
The Format is the file format for the result of the command. Options are: html, json, or xml. A result code and description are returned:
| Code | Description |
|---|---|
| 0 | An unrecognized failure occurred |
| 1 | Success |
| 2 | The data source connection failed (LoggerNet data sources only) |
| 3 | LoggerNet logon failed (LoggerNet data sources only) |
| 4 | Blocked by LoggerNet security (LoggerNet data sources only) |
| 5 | Read only |
| 6 | Invalid table name |
| 7 | Invalid fieldname |
| 8 | Invalid fieldname subscript |
| 9 | Invalid field data type |
| 10 | Datalogger communication failed |
| 11 | Datalogger communication disabled (LoggerNet data sources only) |
| 12 | Blocked by datalogger security |
| 13 | Invalid table definitions (LoggerNet data sources only) |
| 14 | Invalid device name (LoggerNet data sources only) |
| 15 | Invalid web client authorization |
Result codes marked as (LoggerNet data sources only) are applicable only when the API is being used with the Campbell Scientific Web Server.
As an example, to set a Boolean variable called Flag(1) in a datalogger's Public table to True (-1), the command would be:
http://192.168.4.14/?command=setvalueex&uri=dl:public.flag(1)&value=-1&format=html
ClockCheck
Returns the current time of the datalogger clock. ClockCheck includes the following:
URI
The URI can be specified as URI=dl: or URI can be
omitted.
Example:
http://192.168.4.14/?command=ClockCheck
ClockSet
Sets the time in the datalogger. ClockSet has includes the following:
URI
The URI can be specified as URI=dl: or URI can be omitted.
Time
The time to set the clock to, in the format of YYYY-MM-DD T:HH:MM:SS.MS. MS is optional.
Format
The Format is the file format for the result of the command. Options are: html, json, or xml.
A result code, time, and description are returned for ClockCheck and ClockSet. With ClockSet, the time returned is the time before the clock was set.
| Code | Description |
|---|---|
| 1 | The clock was checked (successful) |
| 2 | The clock was set |
| 3 | The LoggerNet session failed (LoggerNet data sources only) |
| 4 | Invalid LoggerNet logon (LoggerNet data sources only) |
| 5 | Blocked by LoggerNet security (LoggerNet data sources only) |
| 6 | Communication with the station failed (LoggerNet data sources only) |
| 7 | Communication with the station disabled (LoggerNet data sources only) |
| 8 | Blocked by datalogger security |
| 9 | Invalid station name (LoggerNet data sources only) |
| 10 | LoggerNet device is busy (LoggerNet data sources only) |
| 11 | Specified URI does not reference a LoggerNet station (LoggerNet data sources only) |
Results codes marked as (LoggerNet data sources only) are applicable only when the API is being used with the Campbell Scientific Web Server.
To set the clock to August 12, 2019, 15:13:10 the command would be:
http://192.168.4.14/?command=ClockSet&uri=dl:&format=html&time=2019-08-12T15:13:10.123
File Management Commands
NewestFile
The NewestFile command will return the most recent file that
matches a given expression, as defined by the expr argument. This command can be used to display the most recent image stored to the datalogger by a camera. The command will return other files, as well, and the file is processed based on the settings in the web client (for instance, if the specified file is a .cr1x file and the command is entered into a browser, the browser may prompt for the file to be saved or for selection of the program to open the file).
URI
The URI can be specified as URI=dl: or URI can be omitted.
Expr
Specifies the path and file pattern for the desired file to be returned. Path determines the drive on the datalogger; i.e., CPU:, USR:, or CRD:. (The only valid option for the CR300 is CPU.) The file pattern can incorporate the use of wildcards. If path is omitted or invalid, or a file matching the pattern does not exist, an Unrecognized Request response is returned.
NewestFile requires a minimum access level of read only.
The following command can be used to return the most recent file on the datalogger’s USR: drive with a JPG extension:
http://192.168.4.14/?command=NewestFile&expr=USR:*.jpg
The following command will retrieve the newest .cr1x file on the datalogger’s CPU, and assign a name to the file of Newest.cr1x:
http://192.168.4.14/newest.cr1x?command=NewestFile&expr=CPU:*.cr1x
ListFiles
The ListFiles command returns a list of files stored in the specified directory (i.e., /CPU, /USR, /CRD, /USB) of the datalogger. The ListFiles command requires at minimum security level of read/write.
Format
The Format is the format in which to return the list of files. Options are: html, json, and xml.
ListFiles returns the following, formatted in a table:
- Path: The path of the file or directory, relative to the URL.
- Is Directory: A Boolean that indicates whether or not the returned object is a directory.
- Size: An integer that provides the size of a file in bytes, or the number of bytes free in a directory.
- Last Write: A string that specifies the date and time a file was last written (returned for files only).
- Run Now: A Boolean that indicates whether or not the file (a datalogger program) is marked by the datalogger file system as currently running.
- Run On Power Up: A Boolean that indicates whether or not the file (a datalogger program) is marked by the datalogger file system as run on power up.
- Read Only: A Boolean that indicates whether or not the file is marked by the datalogger file system as read only.
- Paused: A Boolean that indicates whether or not the file (a datalogger program) is marked by the datalogger file system as paused.
To return all files on the datalogger's CPU, the command would be:
http://192.168.4.14/CPU/?command=ListFiles&format=html
FileControl
The FileControl command allows you to perform actions on files that are located on one of the datalogger's drives. FileControl includes the following:
URI
The URI can be specified as URI=dl: or URI can be omitted.
File
The name of the file on which to perform the file control operation. This command is optional for Actions 7, 8, 9, 11, and 12.
File2
The name of the second file required for the command. This command is used for options 15, 16, 17, 18, 19, and 20.
Action
The following actions are supported:
| Code | Description |
|---|---|
| 1 | Compile and run the file specified by File and mark it as the program to be run on power up. |
| 2 | Mark the file specified by File as the program to be run on power up. |
| 3 | Mark the file specified by File as hidden. |
| 4 | Delete the file specified by File. |
| 5 | Format the device specified by File. |
| 6 | Compile and run the file specified by File without deleting existing data tables. |
| 7 | Stop the currently running program. |
| 8 | Stop the currently running program and delete associated data tables. |
| 9 | Install the operating system (*.obj) specified by File. The file must reside on the datalogger's CPU drive (sent to the datalogger using HTTPPut) |
| 10 | Compile and run the program specified by File but do not change the program currently marked to run on power up. |
| 11 | Pause execution of the currently running program. |
| 12 | Resume execution of the currently paused program. |
| 13 | Stop the currently running program, delete its associated data tables, run the program specified by File, and mark the same file as the program to be run on power up. |
| 14 | Stop the currently running program, delete its associated data tables, and run the program specified by File without affecting the program to be run on power up. |
| 15 | Move the file specified by File2 to the name specified by File. |
| 16 | Move the file specified by File2 to the name specified by File, stop the currently running program, delete its associated data tables, and run the program specified by File2 while marking it to run on power up. |
| 17 | Move the file specified by File2 to the name specified by File, stop the currently running program, delete its associated data tables, and run the program specified by File2 without affecting the program that will run on power up. |
| 18 | Copy the file specified by File2 to the name specified by File. |
| 19 | Copy the file specified by File2 to the name specified by File, stop the currently running program, delete its associated data tables, and run the program specified by File2 while marking it to run on power up. |
| 20 | Copy the file specified by File2 to the name specified by File, stop the currently running program, delete its associated data tables, and run the program specified by File2 without affecting the program that will run on power up. |
Format
The Format is the file format for the result of the command. Options are: html, json, or xml.
FileControl returns the following:
- Outcome: If 0 is returned, the command succeeded. Any non-zero value indicates a failure.
- Time: The number of seconds that the web client should wait before attempting more communication with the station. A value of 0 means communication can resume immediately.
- Description: Provides details about the FileControl attempt.
As an example, to set a program named tc-fast.cr1x on the datalogger's CPU drive to run on power up, enter the following command:
http://192.168.4.14/?command=filecontrol&file=CPU:tc-fast.cr1x&action=2
ADDFILE
The AddFile command adds a file to a datalogger’s /cpu/, /crd/, or /usb/ directory. The AddFile command requires a minimum security of read/write. This example will show how to upload a new program into the /cpu/ directory.
Format
Authorization: A Base64 representation of the username/password combination. It should be formatted as follows: username:password.
Filename: The filename of the file being uploaded to the datalogger.
URI: The URI of this command is http://192.168.4.14/CPU/Filename.cr6
For example, to upload a file named testing.cr6 to a CR6 with an IP address of 192.168.4.14 and the credentials testing (username) and tesing1234 (password) you would execute the following curl request:
curl -XPUT -v -S -T "testing.cr6" –user testing:testing1234 http://192.168.4.14/cpu/
Another example of this in Python code is as follows:
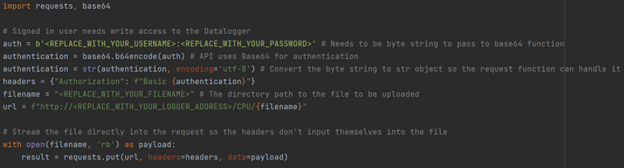
NOTE: If a file with an .obj extension is uploaded to the /cpu/ directory, the OS sees it as a new OS and does not upload it to the cpu directory. It captures it like it does when you send an OS via the Connect screen in LoggerNet. The OS is uploaded, and when complete, it reboots and compiles the new OS just the same as if you sent it via the Connect Screen.