Collecting data
The data logger writes to data tables based on intervals and conditions set in the ![]() CRBasic Campbell Scientific's BASIC-like programming language that supports analog and digital measurements, data processing and analysis routines, hardware control, and many communications protocols. program
CRBasic Campbell Scientific's BASIC-like programming language that supports analog and digital measurements, data processing and analysis routines, hardware control, and many communications protocols. program![]() data logger support software LoggerNet, RTDAQ, and PC400 - these Campbell Scientific software applications include at least the following functions: data logger communications, downloading programs, clock setting, and retrieval of measurement data.. During data collection, data is copied to the computer and still remains on the data logger. Collections may be done manually, or automatically through scheduled collections set in LoggerNet Setup. Use these instruction or follow the Collect Data Tutorial
data logger support software LoggerNet, RTDAQ, and PC400 - these Campbell Scientific software applications include at least the following functions: data logger communications, downloading programs, clock setting, and retrieval of measurement data.. During data collection, data is copied to the computer and still remains on the data logger. Collections may be done manually, or automatically through scheduled collections set in LoggerNet Setup. Use these instruction or follow the Collect Data Tutorial  .
.
Collecting data using LoggerNet
-
From the
 LoggerNet Campbell Scientific's data logger support software for programming, communications, and data retrieval between data loggers and a computer. toolbar, click Main and Connect
  , select the data logger from the Stations list, then Connect
  .
. -
Click Collect Now
 .
. -
After the data is collected, the Data Collection Results window displays the tables collected and where they are stored on the computer.
-
Select a data file, then View File to view the data. See Viewing historic data.
Collecting data using RTDAQ
-
Click Connect
on the main RTDAQ Real Time Data Acquisition software for high-speed data acquisition applications. RTDAQ supports a variety of telecommunication options, manual data collection, and extensive data display. It includes Short Cut for creating data logger programs, as well as full-featured program editors. window. -
Go to the Collect Data tab.
-
Leave the default Collection Options:
-
Collect Mode should be Data Since Last Collection
-
File Mode should be Append to End of File.
-
File Format should be ASCII Table Data (TOA5)
-
-
Select the check boxes for tables in the Table Collection list to indicate which tables will be collected.
-
Click Start Collection.
-
After the data is collected, the Data Collection Results window displays the tables collected and where they are stored on the computer.
-
Select a data file, then View File to view the data. See Viewing historic data.
Collecting data using an FTP client
FTP is an efficient method to retrieve large files from the SSD. Data files created by TableFile() can be up to 2GB.
-
See steps 1 through 8 of the Ethernet communications option for information on connecting to the data logger using
Device Configuration Utility The degree to which the result of a measurement, calculation, or specification conforms to the correct value or a standard. .
. -
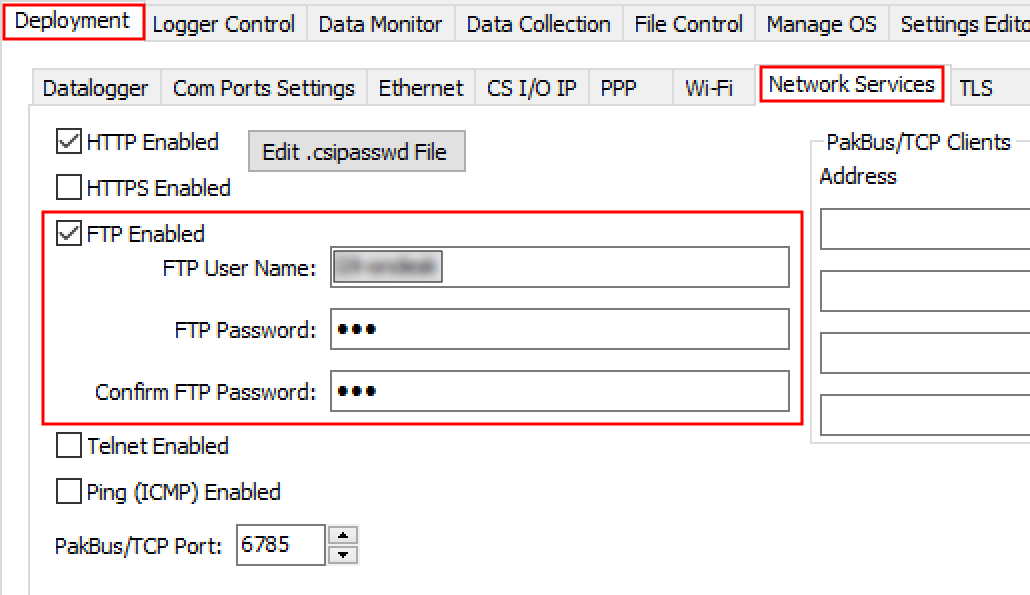
Once connected, go to the Deployment > Network Services tab.
-
Select the check box for FTP Enabled.
-
Enter an FTP User Name and FTP Password, and Confirm FTP Password.
-
Write down the data logger IP address. Find it on the Deployment > Ethernet tab.
-
Use an FTP Client, such as FileZilla, to copy the files to your computer. You will need the data logger IP address, FTP User Name and FTP Password.
-
Use View Pro to view the data, see Viewing historic data
Collecting data using PC400
-
Click Connect
on the main PC400 window. -
Go to the Collect Data tab.
-
By default, all output tables set up in the data logger program are selected for collection. Typically, the default tables (DataTableInfo, Public, and Status) are not collected.
-
Select an option for What to Collect. Either option creates a new file if one does not already exist.
-
New data from data logger (Append to data files): This is the default, and most often used option. Collect only the data, in the selected tables, stored since the last data collection from this instance of PC400 and append this data to the end of the existing files on the computer.
-
All data from data logger (Overwrite data files): Collects all of the data in the selected tables and overwrites (or replaces) the existing data files on the computer.
-
-
Click Start Data Collection.
-
After the data is collected, the Data Collection Results window displays the tables collected and where they are stored on the computer.
-
Select a data file, then View File to view the data. See Viewing historic data.