Sending data to a MQTT broker
MQTT communications require a broker configured for data logger connections. Various brokers are available, so it is recommended to consult an IT professional when selecting one for your application.
Before configuring your data logger for MQTT communications, gather information about the destination server (MQTT broker) and configure the data logger with the appropriate settings.
Required server information
-
The server (MQTT broker) URL address
-
The port number for MQTT communication
-
The authentication method
-
Certificates (if using mutual authentication)
-
-
Determine a unique Client ID for each data logger in your network; default is data logger model, underscore serial number
-
A username (if required by your network)
-
A password (if required by your network)
-
MQTT base topic
Basic data logger MQTT settings
You will use the ![]() Device Configuration Utility Software tool used to set up data loggers and peripherals, and to configure PakBus settings before those devices are deployed in the field and/or added to networks. Also called DevConfig., to configure these data logger settings with the appropriate sever information. The Mosquitto example demonstrates configuring these settings for data logger communications with the Mosquitto test broker.
Device Configuration Utility Software tool used to set up data loggers and peripherals, and to configure PakBus settings before those devices are deployed in the field and/or added to networks. Also called DevConfig., to configure these data logger settings with the appropriate sever information. The Mosquitto example demonstrates configuring these settings for data logger communications with the Mosquitto test broker.
-
MQTT Enable
-
MQTT Broker URL
-
MQTT Auto Publish Data
-
MQTT Server Port
-
MQTT Client ID: Must be unique for each data logger
-
MQTT Username: May not be required for your connection
-
MQTT Password: May not be required for your connection
-
MQTT Base Topic: By default it is
cs/v1/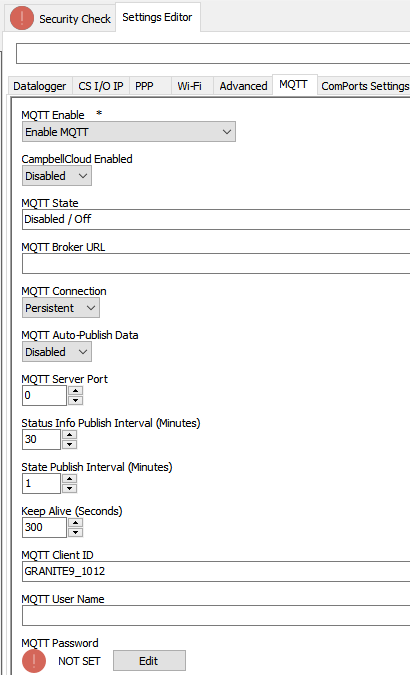
MQTT settings in Device Configuration Utility
Additional MQTT settings
Following are additional MQTT settings that are not required for basic set up, but may be useful for specific applications.
-
MQTT connection: Persistent (default) or Clean
-
Clean means the broker will not retain any previous subscription information. No subscription details will be retained once the connection is closed
-
-
Status Info Publish Interval: Minutes between publishing data logger Status information; default is 30 minutes
-
State Publish Interval: Minutes between publishing Online/Offline/File Transfer States; default is 1 minute
-
Keep Alive : Time (in seconds) between sending MQTT ping packets to broker; default is 300 seconds
-
Last Will Topic: If device is disconnected without a MQTT Disconnect Command, the MQTT broker will publish to this topic
-
Last Will Message: The message that will be published on the Last Will Topic by the MQTT broker if disconnected without a MQTT Disconnect Command
-
MQTT Last Will Topic Publish QoS: Sets the Quality of Service for publishing the MQTT Last Will Message; default is 0
-
MQTT Last Will Message Retained by Broker: Default is Do Not Retain
See the ![]() Device Configuration Utility Software tool used to set up data loggers and peripherals, and to configure PakBus settings before those devices are deployed in the field and/or added to networks. Also called DevConfig. Help for more information about these settings.
Device Configuration Utility Software tool used to set up data loggers and peripherals, and to configure PakBus settings before those devices are deployed in the field and/or added to networks. Also called DevConfig. Help for more information about these settings.
Mosquitto example
This example uses the public Mosquitto test broker https://test.mosquitto.org/ ![]() for testing. This section is provided as a convenience; Campbell Scientific does not provide technical support for Mosquitto.
for testing. This section is provided as a convenience; Campbell Scientific does not provide technical support for Mosquitto.
-
Ensure your data logger is connected to the internet.
-
Using
 Device Configuration Utility Software tool used to set up data loggers and peripherals, and to configure PakBus settings before those devices are deployed in the field and/or added to networks. Also called DevConfig., connect to the data logger.
 -
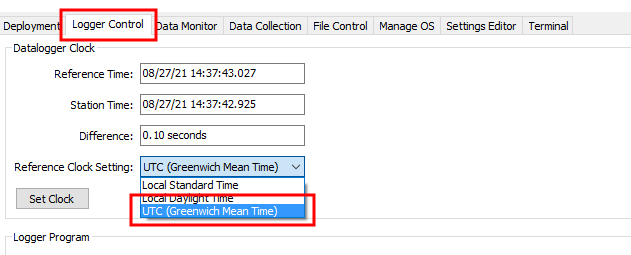
(Recommended) On the Logger Control tab, set the Reference Clock Setting to UTC.
-
On the Settings Editor tab, click the MQTT sub-tab.

(Click image to expand/collapse display)
- Enable MQTT.
- Enter the Broker URL. Enter
test.mosquitto.orgfor this example. - Select Persistent for MQTT Connection type.
- Enter
1883for the Port Number. - Write down the MQTT Base Topic; it is case sensitive; by default it is
cs/v1/. - Keep all other MQTT settings as their defaults.
-
Click Apply.
Program the data logger
Use MQTTPublishTable() within a DataTable/EndTable declaration to publish stored data via MQTT. See the CRBasic help ![]() for details on these instructions.
for details on these instructions.
|
|