Creating a Short Cut data logger program
.CR1X,.CRB, or .DLD.
Data logger programs are executed on a precise schedule termed the ![]() scan interval The time interval between initiating each execution of a given Scan() of a CRBasic program. If the Scan() Interval is evenly divisible into 24 hours (86,400 seconds), it is synchronized with the 24 hour clock, so that the program is executed at midnight and every Scan() Interval thereafter. The program is executed for the first time at the first occurrence of the Scan() Interval after compilation. If the Scan() Interval does not divide evenly into 24 hours, execution will start on the first even second after compilation., based on the data logger internal clock.
scan interval The time interval between initiating each execution of a given Scan() of a CRBasic program. If the Scan() Interval is evenly divisible into 24 hours (86,400 seconds), it is synchronized with the 24 hour clock, so that the program is executed at midnight and every Scan() Interval thereafter. The program is executed for the first time at the first occurrence of the Scan() Interval after compilation. If the Scan() Interval does not divide evenly into 24 hours, execution will start on the first even second after compilation., based on the data logger internal clock.
Measurements are first stored in temporary memory called ![]() variables A packet of memory given an alphanumeric name. in the
variables A packet of memory given an alphanumeric name. in the ![]() Public table A CRBasic command for declaring and dimensioning variables. Variables declared with Public can be monitored during data logger operation.. Data stored in variables is usually overwritten each scan. Periodically, generally on a time interval, the data logger stores data in tables. The
Public table A CRBasic command for declaring and dimensioning variables. Variables declared with Public can be monitored during data logger operation.. Data stored in variables is usually overwritten each scan. Periodically, generally on a time interval, the data logger stores data in tables. The ![]() data tables A concept that describes how data is organized in memory, or in files that result from collecting data in memory. The fundamental data table is created by the CRBasic program as a result of the DataTable() instruction and resides in binary form in memory. The data table structure resides in the data cache, in discrete data files, and in files that result from collecting final-data memory with data logger support software. are later copied to a computer using your data logger support software.
data tables A concept that describes how data is organized in memory, or in files that result from collecting data in memory. The fundamental data table is created by the CRBasic program as a result of the DataTable() instruction and resides in binary form in memory. The data table structure resides in the data cache, in discrete data files, and in files that result from collecting final-data memory with data logger support software. are later copied to a computer using your data logger support software.
Use ![]() Short Cut A CRBasic programming wizard suitable for many data logger applications. Knowledge of CRBasic is not required to use Short Cut. software to generate a program for your data logger. Short Cut is included with your
Short Cut A CRBasic programming wizard suitable for many data logger applications. Knowledge of CRBasic is not required to use Short Cut. software to generate a program for your data logger. Short Cut is included with your ![]() data logger support software LoggerNet, RTDAQ, and PC400 - these Campbell Scientific software applications include at least the following functions: data logger communications, downloading programs, clock setting, and retrieval of measurement data..
data logger support software LoggerNet, RTDAQ, and PC400 - these Campbell Scientific software applications include at least the following functions: data logger communications, downloading programs, clock setting, and retrieval of measurement data..
This section guides you through programming a CR1000X/CR1000Xe data logger to measure the voltage of the data logger power supply, the internal temperature of the data logger, and a thermocouple. With minor changes, these steps can apply to other measurements.
 :
:
-
Using data logger support software, launch Short Cut.
-
 LoggerNet Campbell Scientific's data logger support software for programming, communications, and data retrieval between data loggers and a computer. users, click Program then Short Cut
  .
.
-
-
Click Create New Program.
-
Select
NOTE:The first time Short Cut is run, a prompt asks for a noise rejection choice. Select 60 Hz Noise Rejection for North America and areas using 60 Hz ac voltage. Select 50 Hz Noise Rejection for most of the Eastern Hemisphere and areas that operate at 50 Hz.
A second prompt lists sensor support options. Campbell Scientific, Inc. (US) is usually the best fit outside of Europe.
To change the noise rejection or sensor support option for future programs, use the Program menu.
-
Lists of Available Sensors and Devices and Selected Measurements Available for Output are displayed. Battery voltage
BattVand internal temperaturePTemp_Care selected by default. During operation, battery and temperature should be recorded at least daily to assist in monitoring system status. -
Use the Search feature or expand folders to locate your sensor or device. Double-click on a sensor or measurement in the Available Sensors and Devices list to configure the device (if needed) and add it to the Selected list. For the example program, expand the Sensors and Temperature folders and double-click Type T Thermocouple.
-
If the sensor or device requires configuration, a window displays with configuration options. Click Help at the bottom of the window to learn more about any field or option. For the example program, accept the default options:
-
1 Type T TC sensor
-
Temp_C as the Temperature label, and set the units to Deg C
-
PTemp_C as the Reference Temperature Measurement
-
-
Click the Wiring tab at the top of the page to see how to wire the sensor to the data logger. With the power disconnected from the data logger, insert the wires as directed in the diagram. Ensure you clamp the terminal on the wire, not the colored insulation. Use the included flat-blade screwdriver to open and close the terminals.
-
Click OK.
-
Click Next.
-
Use the Output Setup options to specify how often to make measurements and how often outputs are to be stored. Type 1 in the How often should the data logger measure its sensor(s)? box. Leave the units as Seconds.
-
Multiple output intervals can be specified, one for each output table (Table1 and Table2 tabs). For the example program, only one table is needed. Click the Table2 tab and click Delete Table.
-
In the Table Name box, type a name for the table. For example: OneMin.
-
Select a Data Output Storage Interval. For example: 1 minute.
-
Click Next.
-
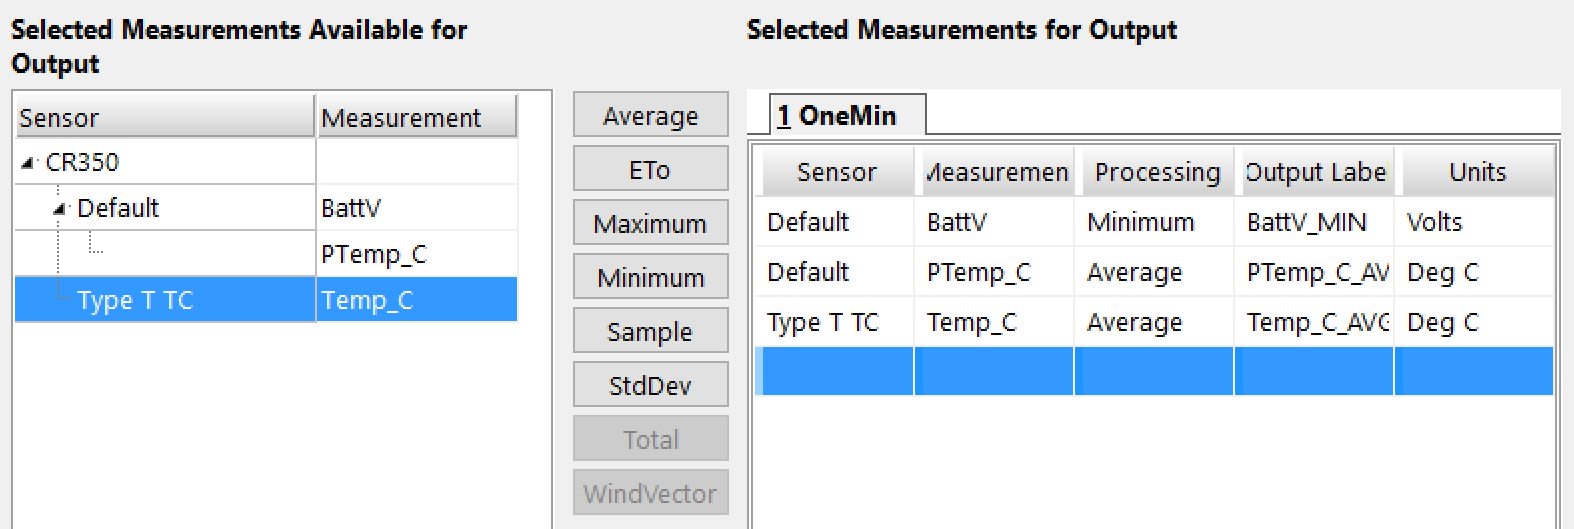
Select a measurement from the Selected Measurements Available for Output list, then click an output processing option to add the measurement to the Selected Measurements for Output list. For the example program, select BattV and click the Minimum button to add it to the Selected Measurements for Output list. Do not store the exact time that the minimum occurred. Repeat this procedure for an Average PTemp_C and Average Temp_C.
(Click image to expand/collapse display) -
Click Finish and give the program a meaningful name such as a site identifier. Click Save.
-
If LoggerNet or other data logger support software is running on your computer, and the data logger is connected to the computer
TIP:It is good practice to always retrieve data from the data logger before sending a program; otherwise, data may be lost. See Collecting data for detailed instruction.
-
Make note of the newly generated program location and filename. By default, programs created with Short Cut are stored in
C:\Campbellsci\SCWin\. -
Close Short Cut.
If your data acquisition requirements are simple, you can probably create and maintain a data logger program exclusively with Short Cut. If your data acquisition needs are more complex, the files that Short Cut creates are a great source for programming code to start a new program or add to an existing custom program using CRBasic. See the CRBasic Editor help for detailed information on program structure, syntax, and each instruction available to the data logger ![]()
Once a Short Cut generated program has been edited with CRBasic Editor, it can no longer be modified with Short Cut.